Companion Application#
The OmniRing comes with a companion app for both Android and iOS. To download the app, please search “CirqtLab Kit” on the respective application store:
Google Play: https://play.google.com/store/apps/details?id=com.opencirqt.cirqtlabkit.app
App Store: https://apps.apple.com/us/app/cirqtlab-kit/id6755078378
Application Overview#
The application is capable of the following:
Real-time graphing of at most two sets of data points
Sampling frequency monitoring
Full data points collection
Built-in file manager and compression utility
Airdrop enabled (iOS & Pixel 10 Series)
Application Settings#
Graphing Data Selection#
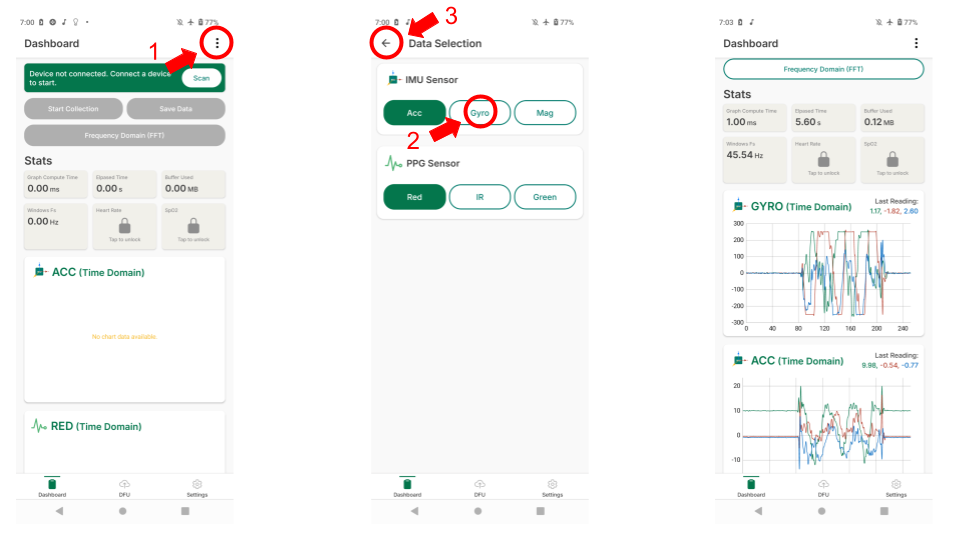
Main screen with “Select Data” button#
To select data to graph:
Tap on the “Select Data” button in the top right corner
Select two types of data sets to display
Once the desired data is selected, tap back button on the top left
The app will return to the data displaying page for live data display
Configuring Collection File Prefix#
Data points collected will be written as a CSV file; the filename prefix can be configured depending on the use case.
To configure the file name prefix:
Tap on the gear icon on the top right
Tap on “Prefix Setting”
Enter the desired prefix (default is “data”)
Tap on “Submit”
Clearing Archive Cache#
For file compression to work, a cache file will be generated each time export folder function is used. To clear space, it is good practice to clear application cache after a data collection session is finished.
To clear the application cache:
Tap on the gear icon on the top right
Tap on “Clear Cache”
Data Collection Procedure#
Connect to Ring#
Once the ring is turned on and data selection is complete:
Tap on the “Connect” button on the bottom of the screen
Once scan is complete, tap on “Select” on the ring
The app should automatically return to the screen and be ready to collect data
Collection and Saving#
To start collecting data:
Tap on the “Save/Start Collection” button
To stop the collection, tap on the “Stop Collection” button
Note
Once stop is tapped, the app will hang for a moment if the recording time is long, and the entire collection graph is shown.
To save the collection data:
Tap on “Save/Start Collection” button again
A prompt will appear
Tap on “Save” to save the collection data
Or tap “Discard and start” to restart the collection
Convert from Time Domain to Frequency Domain#
To convert the collected data from time domain to frequency domain, tap on the “FFT” button on the screen after stopping the collection. The app will process the data and display the frequency domain graph.
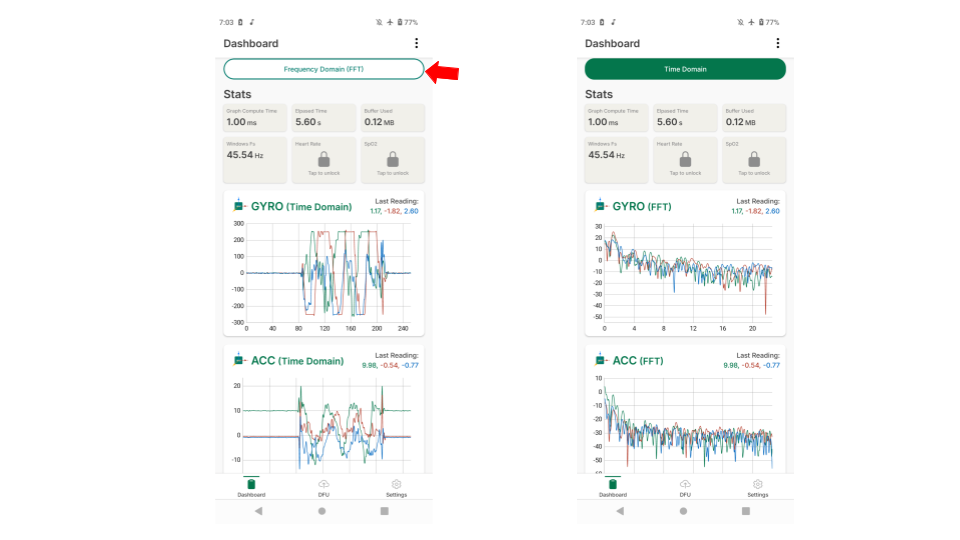
Frequency domain graph after FFT conversion#
The FFT parameters are as follows:
Parameter |
Default |
High Resolution |
Fast Computation |
Balanced |
PPG Analysis |
Accelerometer Analysis |
|---|---|---|---|---|---|---|
fftSize |
512 |
2048 |
256 |
512 |
1024 |
512 |
samplingRate |
100 |
100 |
100 |
100 |
100 |
50 |
windowFunction |
hanning |
hanning |
hanning |
hanning |
hanning |
hanning |
useLogScale |
true |
true |
true |
true |
true |
true |
minFrequency |
0 |
0 |
0 |
0 |
0.5 |
0 |
maxFrequency |
50 |
50 |
50 |
50 |
5 |
25 |
overlapPercent |
50 |
75 |
25 |
50 |
50 |
50 |
File Manager#
The application includes a basic file manager that supports basic file management and exporting functionality.
File Management#
File and Folder Deletion#
To delete a file or folder:
Tap on the gear icon on the top right
Tap on “File Manager”
Search for the prefix’s name (default is “data”)
TAP and HOLD the entry until a prompt appears
Choose “OK” to delete the directory or single file
Exporting#
Export data is supported in two ways: single data export and folder data export.
Export Single File#
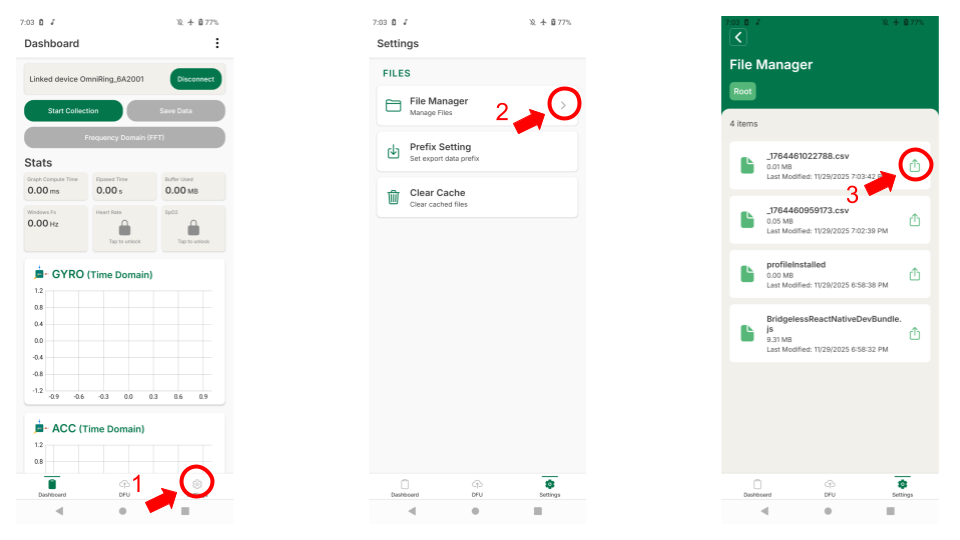
File manager interface for single file export#
To export a single file:
Tap on the gear icon on the bottom right
Tap on the set prefix’s name (default is “data”)
Search for the file intended to export and tap “export”
To return to the upper directory, tap “/”
Export Folder#
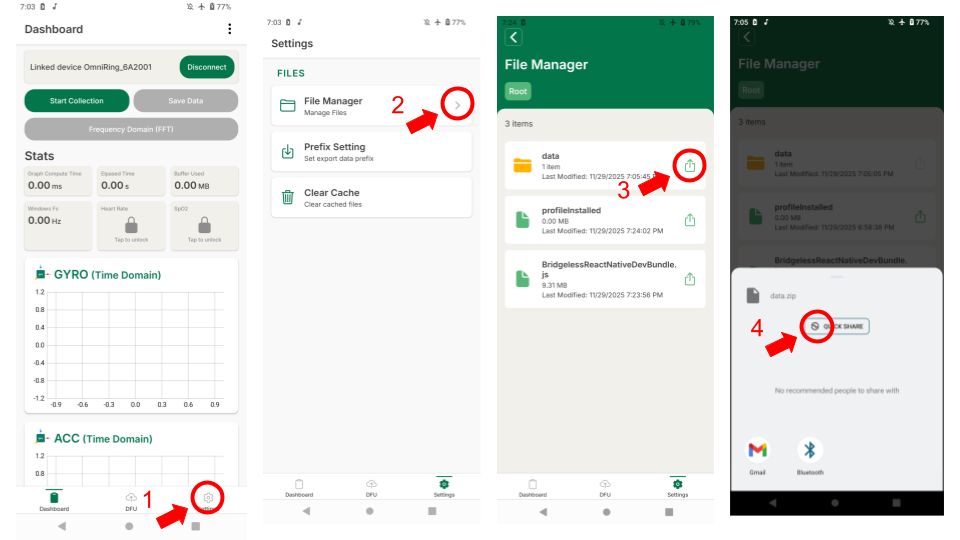
File manager interface for folder export#
To export an entire folder:
Tap on the gear icon on the bottom right
Tap on “File Manager”
Search for the prefix’s name (default is “data”)
Tap “export”
Tip
Exporting a folder will compress all files into a single archive for easier sharing.